
Every year, a staggering 60% of household waste comes from food scraps—reaching over 600 million tonnes globally.
It doesn’t need to be this way. Instead of sending this waste to landfill, where it generates methane emissions, you can turn it into valuable, nutrient-rich compost right in your kitchen.
From worm composting to Bokashi bins, this guide will walk you through easy and effective methods for kitchen composting, helping you reduce waste and nurture your plants. Along the way, I’ll share some of the successes (and failures) I’ve had over 14 years of composting.
Whether you’re a beginner or looking for innovative ideas to minimize your environmental footprint, this guide has something for everyone.
Ready to get started? Let’s dive into kitchen composting…
The benefits of kitchen waste composting

- Stop odours
I’ve noticed that many new composters are worried about odors. However, don’t forget that even if you don’t already compost, you are probably already storing food waste for collection.
With the composting systems and techniques we’ll explore, you may well find you have fewer odors that you have right now. Options include regular emptying into a
- Turn waste into black gold
Every year, I mulch my veg patch and polytunnel with compost, as well as regularly potting on perennial pot plants such as my Thai Lime plant.
If I had to buy all that compost, I’d have to spend a fortune. What’s more, I’ve found that the results of some of my compost (specifically my worm castings) outperform store bought compost.
With the best will in the world, commercial compost companies can get problems with materials contaminated with herbicides. This can be disastrous – I once lost months of produce from one vegetable bed because of herbicide contamination.
However, when you make your own compost, and all that goes is in your kitchen and garden waste, you can be sure that you compost is natural and safe. It will enrich your soil, improve water retention, and create a sustainable loop by feeding your plants with nutrients from kitchen scraps.
- Reduce harm to the environment
Food waste makes up 21% of landfill waste globally and is a significant contributor to methane emissions—a greenhouse gas 30 times more harmful than carbon dioxide.
Composting at home can reduce methane emissions by up to 84%, making it one of the simplest ways to cut your carbon footprint. Even composting a single ton of food waste has a measurable environmental impact.
Learn more about the benefits of composting.
- An educational opportunity
If you have kids, kitchen composting is a hands-on and fund way to teach them about sustainability and compost science. (I find that small children are particularly fascinated by my worm farm!)
First steps: Collecting your waste
Kitchen caddy
A kitchen compost caddy is one of the easiest ways to collect food scraps before composting. I use three compost caddies, one at home and two at work, to collect and manage kitchen waste effectively, but one is certainly enough to get started!
You can either buy a ready-made caddy or make one yourself using a container with a lid. Commercial caddies, however, have one key advantage: they often come with a carbon filter to capture odors. While this might not be crucial during cooler months, it’s super helpful in summer when heat and flies can become a problem.
🥬
Looking for the Best Kitchen Compost Caddy?
We’ve tested and reviewed the top kitchen compost bins to help you find the perfect fit for your space.
See Our Top Picks →
If you’re emptying your waste daily, though, any bowl or lidded container will do
A word on ‘compostable’ kitchen liners
You’ve probably seen compostable kitchen liners advertised as eco-friendly, but their effectiveness can be hit or miss in home composting systems.
In my experience, these liners often fail to break down completely, leaving behind a semi-decomposed mess in Bokashi bins or traditional compost bins. Research backs this up, showing that most home composting setups aren’t hot enough to fully decompose liners.
Instead of relying on liners, consider skipping them to save money and reduce unnecessary waste. If you prefer to use liners, look for those made specifically for a composting system such as the Biobag Kitchen Composter.
Freeze
What if you can’t empty your caddy regularly?
I’m a keen composter, but when the wind is howling, the rain horizontal and the conditions bitterly cold, even I am loathe to make the trip to the bottom of the garden. When this happens, freezing is a great alternative.
Simply collect your waste in a resealable bag and store it in the freezer until you’re ready to compost. Freezing also has the added benefit of breaking down cell walls in organic matter, which can speed up decomposition when you add it to your compost.
(Note: This method works best if your freezer has some extra space—not always the case in my household, especially during harvest season!)
Grinding
Some home composters choose to grind their kitchen scraps before composting. The logic here is simple: smaller pieces break down faster. By grinding waste, you increase the surface area, making it easier for bacteria and microorganisms to access nutrients.
However, grinding comes with drawbacks. It’s time-consuming and adds complexity to what should ideally be a simple process. As a lazy composter, I usually skip this step. If you’re ultra keen, grind away, but I’d suggest being wary of anything that makes composting more difficult and time-consuming, as this make it more difficult for the habit to stick.
Summary
Choose the collection method that works best for your lifestyle. A kitchen caddy with a carbon filter is ideal for reducing odors, freezing scraps offers a convenient backup plan, and grinding may be worth considering for those who want faster results. The key is to make the process easy and sustainable for your household.
Next Up: The Composting Process

Now you’ve collected your waste, you’ll want to compost it.
There are two choices here – compost it outside in the garden or in the kitchen. Let’s start with the outdoors…
Outdoor composting methods
Trench Composting: Simple, no-thought waste disposal
Surely the simplest method of all – simply dig a trench in your garden, add kitchen scraps, and cover it with soil. I find this works particularly well when I have smelly material such as fish guts and a cold compost heap, such as in winter.
The only problem I’ve found is that when material is particularly smelly something can come along and dig it up. To avoid this, I either dig it deep or cover it with a wire mesh.
Learn more: Trench Composting Guide.
Compost Bins or Tumblers: Superb option for finished compost
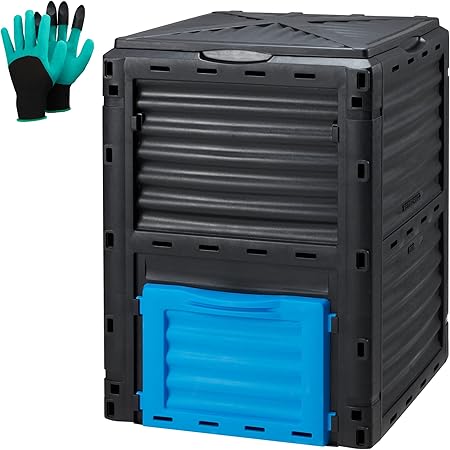
TTransfer your finished waste to an outdoor bin or
Which is the best? I personally prefer compost bins, as when I bought a
Learn more: How to Use a Compost Bin
Three-bin compost system: Best For Volume
If you want to compost more than just kitchen waste and have a large garden, you can’t beat a three bin compost system. In my own garden I use a system built out of used pallets, and it’s surprising just how much volume it can handle. For a smaller system, you can purchase open wooden compost bins.
Learn more: How to build and use a three bin compost system
Outdoor Vermicomposting: Let Worms Munch Your Waste

Worm bins can be purchased or made very cheaply from plastic storage containers. Start with simple bedding materials like shredded paper and old compost and add worms. Start feeding them slowly at first, but when they get going they can eat up to half their body weight a day.
These castings can give some amazing results, and this year I grew my best chillis yet with a mixture of home-made worm castings and regular compost.
Learn more: How to Make a Worm Bin
Those are just a few of many options – for more see our complete guide to composting methods.
In-Kitchen Composting Methods
Micro-composting: The perfect system for small amounts of kitchen waste
Micro-composting is an ideal method for handling small amounts of kitchen waste, especially if you want compost for potted plants. While it’s not suitable for larger quantities of waste and can take longer than some other methods, my experiments have found that you can cheaply and simply compost small amounts of waste.
How to do It:
- Use a bucket or bin with a lid.
- Mix kitchen waste with a dry, carbon-rich material like shredded paper, sawdust, or dried leaves. Aim for at least 50% brown material.
- (Optional) Add a handful of mature compost or soil to introduce helpful microorganisms.
- Stir every couple of days to aerate and accelerate decomposition.
- Monitor moisture levels—compost should feel like a wrung-out sponge. Add more brown material if too wet or a small amount of water if too dry.
Alternative Tip: Drill holes in the sides and bottom of the bin for better oxygen flow, reducing the need to mix. Place a tray underneath to catch any liquid (leachate).
Indoor worm bins

If you’re comfortable with worms in your kitchen, I’m jealous, as my family has banned me from vermicomposting in our house.
If you don’t have that problem, an indoor worm bin is a fantastic option. It’s low-cost, compact, and produces nutrient-rich worm castings ideal for plants.
How to Do It:
- Use two plastic containers (e.g., old ice cream tubs).
- Drill ventilation holes in the top container and drainage holes in the bottom.
- Add damp bedding material such as shredded paper or coir.
- Introduce compost worms and start with a small amount of food waste.
- As worms consume the waste, collect the nutrient-rich castings for your plants.
Bokashi bins – Ferment Your Waste Away
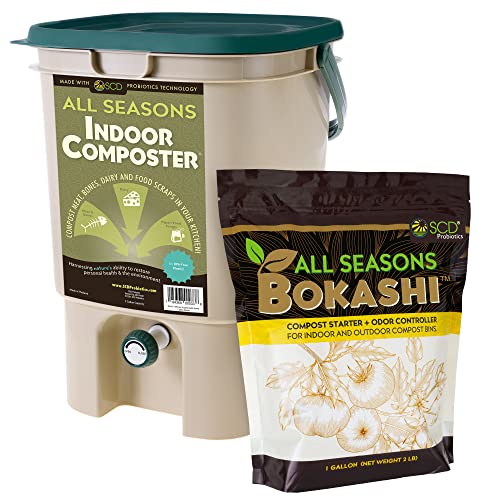
Bokashi bins use bacteria to ferment waste, making them a unique option for indoor composting.
That said, I’m personally not a fan. I think they’re expensive (my own were passed to me by my sister) and they require ongoing purchases of Bokashi bran. What’s more, the end result is not finished compost – it needs further processing or burial in soil before it can be used in the garden.
Where it does come into its own is its ability to handle materials that would otherwise be difficult for a beginner compost to deal with.
Pros:
- Handles items like meat and bones that other methods can’t process.
- Compact and odor-controlled when used correctly.
Cons:
- Requires an additional step to create usable compost.
- Costs more than most other kitchen composting methods.
Learn more: A guide to Bokashi Bins.
Kitchen composting machines: High-tech convenience

Electric composters simplify the composting process, doing most of the work for you. They tend to fall into two categories:
I used to be very sceptical of these, because most of them don’t produce finished compost – they simply grind and dehydrate the material. However, I was impressed when I tried out the Reencle, which uses a mixture of bacteria, heat and air to create actual compost.
Pros:
- Low-maintenance and efficient.
- Attractive and odor-free.
Cons:
- Environmental benefits may be offset by energy use and manufacturing footprint.
- Expensive to buy and operate.
Read more: Reencle Food Waste Composter: Too Good to Be True?
Cardboard box composting: Affordable and odor-proof
In contrast to electric composters, this Japanese method offers an inexpensive and odor-proof way to compost indoors.
How to do it:
- Use a corrugated cardboard box with ventilation holes.
- Add coco peat and rice husk charcoal to absorb moisture and control odors.
- Layer in your food waste.
- Cover with an insect-proof screen to keep pests out.
This method is simple and eco-friendly, making it an excellent choice for those on a budget.
What can and can’t be composted in the kitchen
In theory, nearly anything that has been recently alive can be composted. I’ve even successfully composted fish remains and dead chickens, although I would only ever do this with a steaming hot compost heap.
However, not all materials are suitable for indoor kitchen composting due to the lower temperatures and space constraints of these systems.
What can be composted (in kitchen systems)
- Fruit and vegetable scraps: Peels, cores, rinds, and leftover pieces.
- Coffee grounds and tea bags: Remove staples or non-compostable materials from tea bags.
- Eggshells: Crush for quicker breakdown.
- Dry, brown materials: Shredded paper, sawdust, cardboard, or dried leaves.
- Cooked grains: Rice, pasta, and bread can all be composted, but more care needs to be taken due to their ability to attract pests.
What to Avoid
- Fish, bones, and meat: These attract pests and produce odors in systems that don’t reach high temperatures. (Bokashi bins excepted!)
- Dairy products: Cheese, milk, and butter can lead to odors.
- Greasy or oily foods: These can disrupt the composting process and attract pests.
Learn more: Compost Materials (What You Can and Can’t Compost)
How to use your kitchen compost
When I started composting, I was keen to use compost straight away. However, after using fresh, steaming compost from a municipal compost heap on my vegetable garden, I had very poor results. The same compost several months later worked wonders.
As I know now, that’s because compost needs to go through a stabilization process to reduce salts and transform nutrients into more stable forms that provide long-term benefits for your soil.
Once your compost has matured, there are plenty of ways to put it to good use:
- Enrich your garden soil: Mulch your soil to support beneficial microorganisms that improve plant health and growth.
- Create seed compost: Sieve the compost to remove larger particles and mix it with coir or sand to create a light, nutrient-rich medium for seed starting.
- Boost potted plants: Add compost to potting soil for a natural fertilizer that keeps indoor and outdoor plants thriving.
Learn more: How to Use Compost.
Wrapping up
If that all seems a lot, remember we’ve touched on several different methods here!
The key is to simply select the one that suits you the best, and give it a go.
Remember, composting doesn’t have to be complicated, it can provide benefits to the environment and your plants and can help save you money too!
So why not give it a go?
External resources
Composting For a New Generation: This is my favorite book on composting (see review here). It’s full of clear, actionable advice and composting projects illustrated with easy-to-follow photos.
FAQs
How can I manage the smell from kitchen composting?
Generally speaking, when handled correctly, kitchen composting should not produce unpleasant odors. That said, it can be more challenging at times, especially when the weather is hot or if you are composting more challenging items. If you are having problems, try one or more of the following tips to minimise smell:
- Add carbon-rich materials: A layer of sawdust, shredded paper, or mature compost at the top of the bin helps absorb odors.
- Use biochar or ash: These materials can neutralize smells and improve the compost’s balance.
- Choose the right bin: For kitchen caddies, opt for a model with a carbon filter, which traps odors effectively.
- Monitor moisture levels: Compost that is too wet can smell bad. Keep it as damp as a wrung-out sponge by adding dry materials like shredded cardboard or paper if necessary.
- Mix regularly: Aerating the compost reduces anaerobic activity, which is a common source of unpleasant smells.
How long does it take for kitchen waste to turn into compost?
The time it takes for kitchen waste to become usable compost depends on the composting method and environmental factors.
Traditional Compost Bins or Piles: Typically 3–12 months, depending on how often the compost is turned, how hot the compost gets and the balance of materials.
Bokashi Bins: Produce pre-compost in 2–4 weeks, which then needs to be buried or added to a
Worm Bins (Vermicomposting): 1–3 months, depending on the number of worms and how much waste is added.
How do I know when my compost is ready to use?
The organic material should have turned into a brown crumbly material. To test whether it is ready to use, try germinating some fast-growing seeds like radish in it. If they grow well, your compost is likely ready!
Can I compost cooked food scraps?
This depends on the system you are using. For example, if you are composting in a bucket, I would avoid it. However, it is fine to add cooked scraps to a bokashi bin.
Can citrus peels be composted?
Some sources advise against composting citrus peels, due to the extra acidity they create in the compost. However, if you are composting moderate amounts of citrus peels in a balanced composting environment, the quantity is not usually enough to create a problem.