
Sometimes you have all the time in the world to create a beautiful
And other times you need one fast.
I was in the second situation last year when I had a call that went like this:
“James, do you want a trailer load of manure?”
“Umm, let me think – I’m not sure I have room!”
“James, I need to know now. The manure’s on the trailer and if I can’t dump it at yours right now it’s going down the field.”
“Umm, okay then!”
Before long I had a huge mound of manure on my drive, my pallet bin and my HotBin was full to the brim and my wife was very unhappy with me.

I had to move fast, or I wasn’t getting dinner.
Fortunately, not every compost set up takes an age. I had a hunt around the garden, found some old metal stakes and some leftover chicken wire, and soon had a large bin set up.
In case you find yourself in a similar predicament, or just want a cheap and easy setup, I’ll go over how to do it here.
But first, let’s review the pros and cons, so you can ensure it’s the right option for you.
Looking for the best outdoor compost bins?
Decades of composting taught us which bins are worth the investment (and which aren’t).
See Our Top Picks →Pros and cons of a wire bin
Pros
- Wire bins are extremely quick to set up – you can do a small one in 10 minutes if you have everything you need.
- They are surprisingly durable, especially if you are using metal stakes.
- They’re also easy to take apart and move when you are finished with them.
- You can repurpose the wire and stakes for other purposes.
- The lack of a floor means easy access for worms and other compost-friendly critters.
- It’s cheap!
Cons
- It’s not pretty, especially if you are using rusted old stakes like I am!
- The insulation is poor (although see below for a way round this).
- There’s easy access for rodents (but that’s the same for most compost bins).
- You need to lift material over the top of the bin – that’s more work than a three sided bin or a pallet bin with a gate. (Again, see below for our suggestion to get round this.)
What you need
Obviously, you can adapt materials to what you have lying around, but for the one I made (which I’ll demo in pictures below) all you need is:

- 4 stakes (optional)
- Chicken wire (length depends on the size you make)
- Wire clippers
- Cable ties (optional)
 We earn a commission if you make a purchase, at no additional cost to you.07/08/2026 05:01 pm GMT
Compost Forks I Recommend After 15 Years of Turning
Tested over 15 years of turning piles.
View Guide →How to make it
There’s a couple of ways to make a simple wire
For a small bin, you can:
1. Roll out the chicken wire.
2. Cut it to the desired length. (I repurposed wire from last year’s potato tower, so I skipped this step.)
3. Join the two ends together using cable ties or by twisting the loose wire around the uncut section of wire to secure it in place.

4. Stand the bin up.
If your wire is sturdy enough and you have material available, you could just stop there.
Once you have enough material in it, the weight and mass will keep the bin from being blown over.
Since it’s late winter as I write this, I don’t have much material for the bin.
To keep the wire in place, I decided to add stakes for extra support. Adding stakes also allows me to stretch the wire out.

I already had one wooden stake in the ground, so I simply added three more metal stakes.
As you can see, it’s not pretty, but it’s fast and it’s cheap. For those of you who prefer aesthetically pleasing pictures, I asked AI to imagine what it could look like!

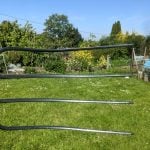
For a larger bin, such as the one I made last year (picture further down this post), you can place the stakes in first.
To save measuring, you can unwrap the wire and attach the first end to the first stake. You can attach it either with cable ties, or by wrapping the wire around the stake and then twisting the loose ends of the wire around the uncut wire.
Then wrap the wire around the stakes to form the bin’s shape.

Once you return to the first stake, cut the wire to length using wire cutters. Secure the end with cable ties or by twisting it around the existing wire.
One side note – if you have a lot of material to add, you might want to leave the bin open. It’s easier to wheel the material in and dump it there than to shovel it over the wire.
When the material has built up, you can close the bin up and add any additional material over the top.
How big should you make it?
If you have enough material, larger is generally better if you want to make compost fast.
That’s because large heaps typically generate more heat than smaller ones because of the outer insulating layer, which leads to a faster composting speed.
However, heat isn’t everything, and your bin will still produce compost even if it is smaller.
If you don’t have a lot of material (and remember, compost material shrinks down rapidly) you’re better off making your wire bin smaller; it’s better to have a small bin full of material than a big bin which is mostly empty.
The demo bin I’ve made here probably isn’t big enough for sustained hot composting*, but I could use it to temporarily store compost material from my veg bed before transferring it to my pallet bin or insulated bin later on.
Using the wire bin
I’m not going to go into great details on how to use a wire
However, one thing worth noting is that wire bins, while great for aeration, don’t provide any insulation.
Fortunately, it’s easy to add insulation. One of my favourite ways is to add a layer of straw around the outside of the bin.

As I build up the bin with organic material, I add more straw as needed.
If you don’t have straw, cardboard will add some insulation.
It’s also a good idea to add some sticks at the bottom of the bin in order to create some air pockets.
In mine, I’ve also added some brush that I’d saved – this is dry and hollow, and should help create air pockets at the bottom of the bin.

I then started adding material on top of that, and between the straw.

Hot bed alternative
With my bin last year, I tried something a bit different.
After setting it up and adding the manure, I let it sit for a bit.

I then added a layer of compost on top, and planted potatoes in the compost.
Unfortunately, I planted the first ones too quickly, and they cooked! However, after leaving it for a week for it to cool down, my next potatoes grew as normal.
I wish I could say they were fantastic, but I only had an average yield from them.
I had better results from smaller bins I made for potato towers, which combined manure with larger amounts of mature compost.
Final thoughts
Wire bins may not be perfect, but they are quick, easy and cheap to set up – and great if you have a sudden influx of compost material.
With a few simple tweaks—like adding insulation—it can work nearly as well as fancy compost bins that cost many times the price of a bit of chicken wire.
So if you’ve been putting off composting because you thought you needed a complicated bin, why not give this a try? You might be surprised at how well it works!
Read more
- The Best Outdoor Compost Bins (USA Guide)
- How to Build a DIY Pallet Compost Bin (Including the Fast and Easy Method!)
- How to Make A DIY Trash Bin Composter (With Passive Aeration)
- How to Build A Simple Worm Composting Bin In Just 20 Minutes
- How to Use a Compost Bin: The Only Guide You’ll Ever Need
Compost Forks I Recommend After 15 Years of Turning
Tested over 15 years of turning piles.
View Guide →